Free Shipping
on orders over £50
on orders over £50
Hello Everyone, I can’t believe this is my final project for the Mad Scrapper Design Team and Blog and how quickly the six months has flown by. Crafting has certainly helped cope with the long days of lockdown and having such fabulous supplies from themadscrapper.co.uk has been brilliant.
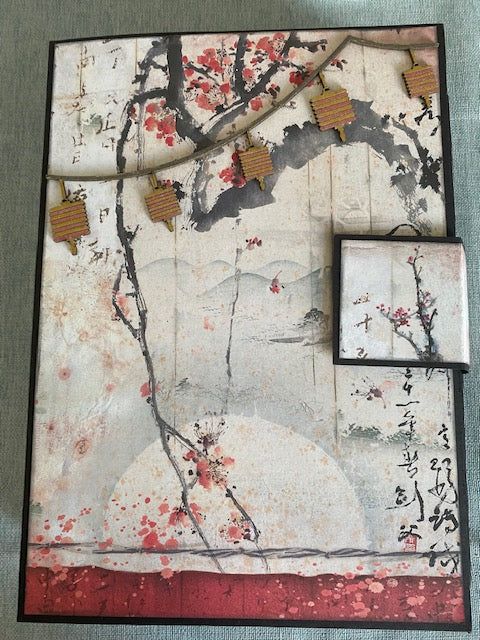
As with all my other albums, I’ve tried to choose papers to fit in with the time of year or theme and we were fortunate in February to have both St Valentine’s Day and Chinese New Year so after browsing for inspiration from the supplies available from The Mad Scrapper online shop, I found the Stamperia Oriental Garden Collection Kit which at the time of writing is sold out, but will be back in stock soon. These papers are absolutely stunning with gorgeous florals and elements.
The embellishments and die cuts to go with this range were also sold out, so I’ve made the most with the cut outs and elements available in the collection kit and other brands.
Supplies from Themadscrapper.co.uk
Stamperia Oriental Garden Collection Kit
Dusty Attic chipboard Hanging latterns
Tim Holtz distress ink pad mini, black soot
Tim Holtz layering stencil, blossom
Tim Holtz mini distress ink pad festive berries
Tim Holtz distress oxide ink pad tattered rose
Tim Holtz distress oxide ink pad antique linen
Other supplies from own stash:
Collal glue
Double sided adhesive tape
Gold cardstock
Black cardstock
White cardstock
Red cardstock
This album has been the biggest of all my design team projects with inspiration from You Tube and Pinterest in terms of what I wanted it to hold, so this one has been designed to showcase 3”x4” 6”x4”, 5”x7” photos with plenty of tuck spots, pockets and areas for journaling. I also used inspiration from Jenofeve Designs Basically Amazing album Template and her You Tube channel. I have lots of photos from my visits to Hong Kong and from Chinese New Year events I attended in the past so this album will be perfect to show case these.
This is the album cover which I matted with patterned paper cut to 6.75” x 9.75” to give a one eighth border. I placed a magnet on the cover before matting it for the side fastening.

Tip:
Always place your magnets on the base cover before matting unless you are using Velcro dots which can be attached after matting. Likewise if using ribbon or tape ties apply these to the cover before matting.
I used the Dusty Attic hanging lanterns which I coloured with a glitter red and gold pen for the lantern and black glitter pen for the string, however you can’t really see it in the photo.

The inside cover of the album has a vertical pocket, however you can put any type of pocket you like and even use dies on the edges if you want a decorate edge border.
The next page has a belly band which is great for using up scraps of patterned paper after you cut any matting pages. I tend to see what scraps I have from cutting main page mats which then determine if I’m going to have belly bands, pocket or tuck spots on my pages. Be as creative as you like with your albums.


These are the middle sections of the pages which lend themselves to having larger 5”x7” photos. I used the built in embellishments to create tuck spots at the bottom of the pages.


These are waterfall pages for vertical 4”x6” photos and I used the scraps and additional cardstock to mat the top waterfall page and for the flap to hold the waterfall pages down. Again I used magnets to hold the flap in place.


This is the middle pages of the album which I decided to make horizontal waterfall pages and pockets. I had run out of patterned paper to mat the pockets so used the Tim Holtz Layering blossom stencil and inks (listed above in supplies) on white cardstock to create patterned mats for the pockets. I really enjoyed my first dabble in to mixed media and will definitely be trying to make my own patterned papers in future.
The album is basically made up of pages that are replicated in terms of page styles but using different matting papers. You don’t have to make albums this large and can reduce your spine to have e.g. a 4 page album so play around and be creative once you decide on a base album, anything else is up to you so you can use dies or punches to change things up.
Happy crafting everyone and signing off my last project.
Liling xx
BASE ALBUM
Supplies needed:
Black cardstock 300gsm if using as a cover, if not cover grey or chipboard with 90gsm black cardstock or paper
Double sided adhesive
Collal glue
Magnets for fastenings
Ruler
Paper Trimmer
Score board

The cardstock I used was 300gsm so I was able to make the album cover with this instead of covering chipboard.

I decided to cut some of the height of the album as I didn’t want it to be as long as the folded A3 page was, so I folded the album into the book shape then cut the ends to the height I wanted with my guillotine paper trimmer which was strong enough to cut through paper this thick. If you don’t have a guillotine then use a metal edged ruler and craft knife to cut the cover to the size you want.


This is how you make the spine for the album cover to hold your pages. If you only want a 4 page album then only made the smaller spine and allow for ½” space in the spine. This spine makes a 8 page album.


These are the dimensions for the pages and pockets, but you can decide to do any type or size of pocket. You can die cut the edges or use punches to decorate the edges of the pages and pockets.
If you like you can make pocket pages in which case you would need to change the dimensions of the pages to the following:
Cut 2 pieces of cardstock
1 x 7.5” x 10.25”
1 x 7.5” x 11.25”, score at 0.5” and 10.75” on long edge, fold, burnish, apply double sided tape then attach to the single sheet to form a pocket which will give you a side pocket page to place over the hinges to attach them to the album.


So once the base album is constructed, you can decide how many pockets you want to make, the style and whether you want belly bands, tuck spots or angled pockets…it’s up to you once you know the basics of construction.

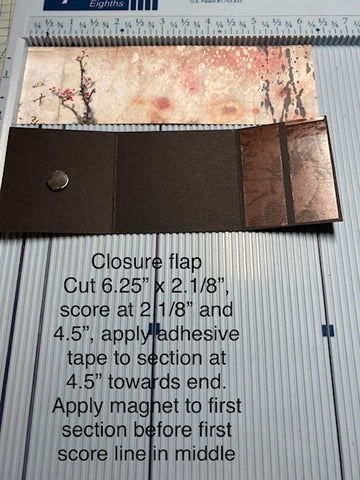
You can also decide what kind of closure you want. I decided to use up all the scraps I had left and made a closure that can be attached by magnets, but you can use ribbon, metal clasps or whatever you have available. Just make sure to do all this before you mat with your patterned paper.

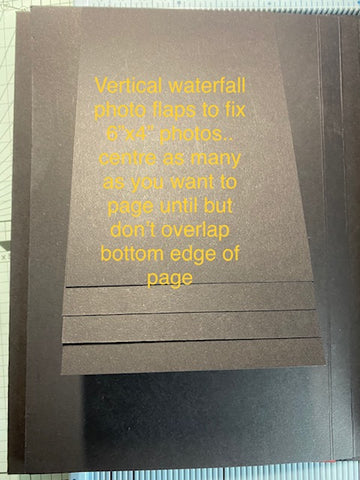
I decided to make both vertical and horizontal waterfall pages as often my 6”x4” photos can be a mixture of both sizes so this gives you options. I only mat the top waterfall page if I have patterned paper that will be suitable as the other waterfall flaps will hold you photos.
I also leave a journaling space below the waterfall flaps, either in the form of space on the top of the pockets or for allowing a few journaling elements to be inserted into the pockets.

So these are the basic processes for an album, look at you tube or pinterest for further inspiration and Happy Crafting… Liling ☺
Comments
Leave a comment